


Ricotta & Broccoli Rabe Tart from Vegetables the Italian Way
A savory ricotta and broccoli rabe tart from Giulia Scarpaleggia's Vegetables the Italian Way, finished with a woven lattice.

Fermenting your sweet potatoes is a great way to add extra depth of flavor to your fries. Think of it as pre-seasoning them via the magic of lacto-fermentation. Plus, they are fermented, so you can feel better about eating these than regular sweet potato fries. Fries that are more flavorful and better for you? That's a win/win.
These sweet potato fries don't need to ferment for very long either. Simply store them at room temperature out of direct sunlight for 3 days and they are ready to go. After fermentation, your sweet potatoes will be absolutely delicious baked or fried.
Give these fermented sweet potato fries a try (our Fermented Vegetable Kit makes it super easy), and we have a feeling you'll be hooked.
How to make fermented sweet potato fries
For this fermented sweet potato fries recipe, you only need a few simple ingredients: sweet potatoes, garlic, red pepper flakes, water, and Kosher salt.
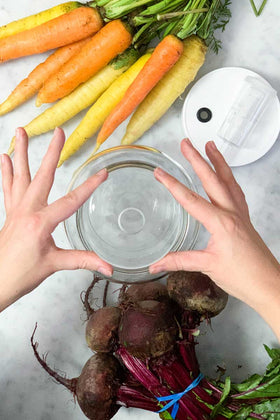
The first thing you need to do is prepare your sweet potatoes—we typically use 3-4 large ones. It's helpful to choose sweet potatoes that are all roughly the same size, so that your fries come out as uniform as possible.
Fill a big bowl with water (big enough to keep all your sweet potato fries submerged while you work) and set it next to you. Then, cut your sweet potatoes into fries. Chop off the ends of each sweet potato, slice lengthwise, and then cut into individual fries. You can choose to peel your sweet potatoes before cutting them, or leave the skins on, whatever you prefer. We like to leave the skin on.
As you go, let your cut fries soak in the bowl of water. Keep them submerged and add more water if needed. This will prevent them from browning or oxidizing while you're getting everything ready.
Once all the sweet potatoes have been cut into fries, it's time to make your brine. Add 2 tablespoons of Kosher salt to 1 quart of water (that's 4 cups) and stir to dissolve completely.
Now it's time to load these fries into a 1/2 gallon glass fermentation jar. We've found that the easiest way to do this is by turning the jar on its side. This technique ensures that you can fit as many fries as possible into the fermenter. (We load carrot sticks the same way.)
Stand your jar upright to finish stuffing as many fries in there as possible, and discard the water your fries were floating in. When all the fries are packed in, add two cloves of garlic and 1 tablespoon red pepper flakes.
Top with a glass fermentation weight to keep all the ingredients in place, and pour your brine over everything. You want all the sweet potato fries to be fully submerged in the brine.
Finish by securing the lid and airlock on your fermentation jar. Let the sweet potato fries ferment for 3 days and they will be ready to cook.
How to cook your fermented sweet potato fries
After 3 days, remove your sweet potato fries from the brine and pat them dry on a dish towel. Once they are nice and dry, these are great baked or fried.
To bake, arrange your fries on a baking sheet lined with parchment paper and bake at 400° Fahrenheit for 25-30 minutes.
In an air fryer, cook your fries at 400° for 15-20 minutes.
To deep fry, drop your fries into oil heated to 325° for 2-3 minutes.
New to fermentation?
Our Fermented Vegetable Kit contains everything you need to easily get started lacto-fermenting at home. Looking for more fermentation recipes? We're sharing new ferments all the time! Subscribe to our YouTube channel for tons more tips and recipes.

FarmSteady started with a simple idea: make projects like this easier to jump into.
$40.00
More about this kit →
A savory ricotta and broccoli rabe tart from Giulia Scarpaleggia's Vegetables the Italian Way, finished with a woven lattice.

Ramp butter is three ingredients and no cooking — the fastest way we've found to stretch a two-week ramp season into a year.

A handmade casarecce recipe from Joshua McFadden’s Six Seasons of Pasta, featuring a silky butternut squash, sausage, and sage sauce.
Leave a comment